
Review spaces and assets
Creating a review space and adding your team, uploading files of any size, the image and video viewer, commenting at a second or on a region, versions and compare, project and file settings, archiving and your plan limit.
Review Spaces give your team an organised place to review files before they are approved, such as a campaign or a photo shoot. Each space is a project with participants and an event timeline, holding assets (files), each with versions, comments and an approval decision. You can also share the project or one of its files with your clients by link, see Share files with clients.
Creating a space
Open the page
In the side menu choose Review Spaces.
Create the space
Press Create Space, enter the Space Name and a Description (optional), then Create.
Open the space
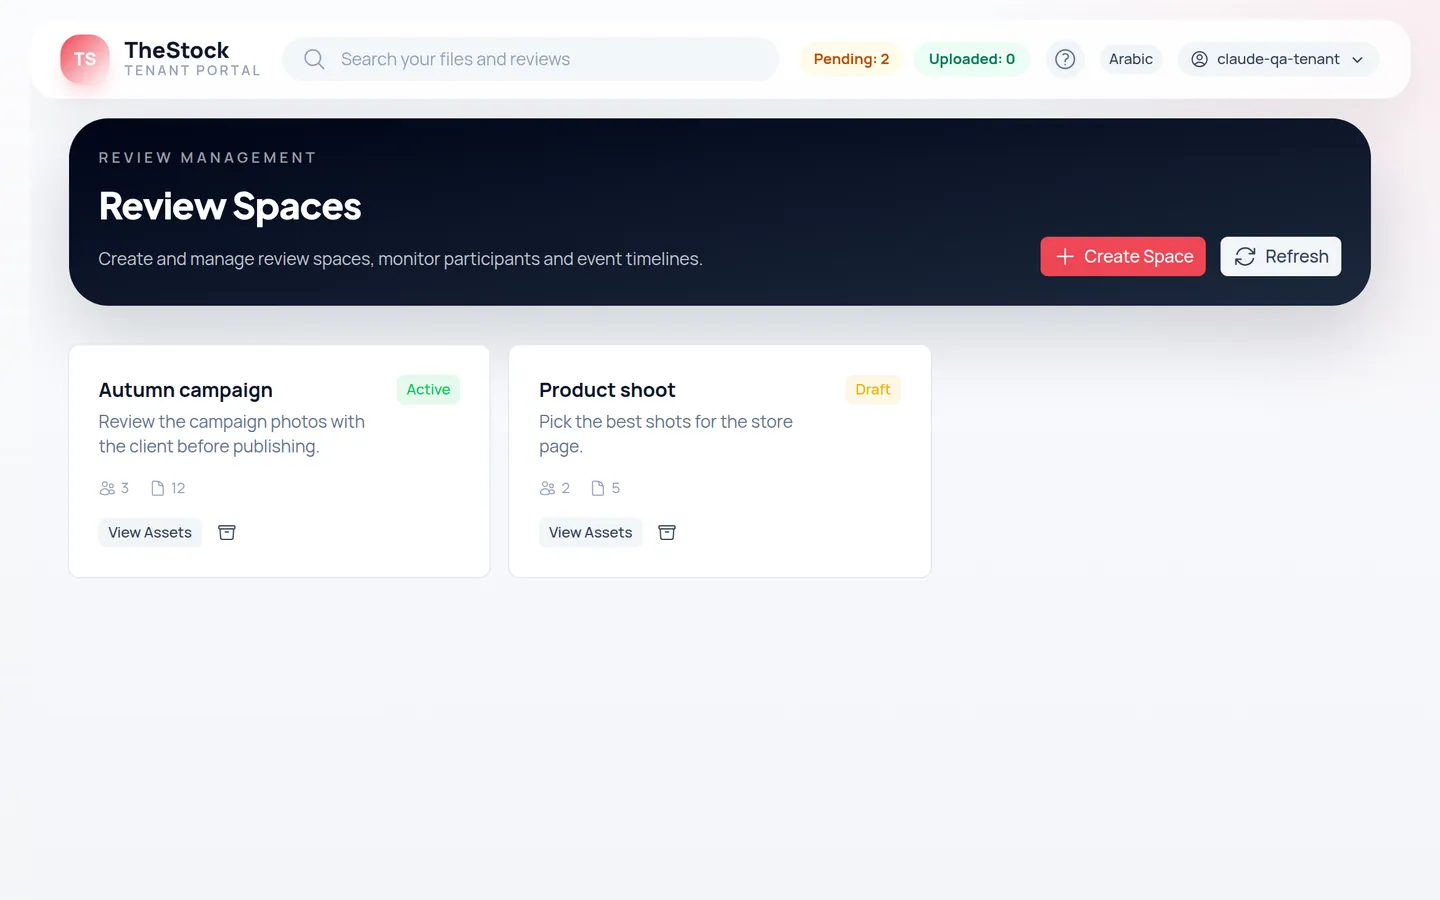
Press the space card to open its Participants and Event Timeline. The card shows the number of participants and assets.
Participants
Participants are members of your store's team. To add someone new, invite them first from the Team page, see Team and roles. Clients from outside your team are not added here: you share with them by link.
Press Add Participant
Inside the space press Add Participant.
Choose the member and role
Choose from Team member, then Role in this space: Reviewer or Editor, and save.
If you see Every team member is already here, or there are none., there is nobody left to add. To remove a participant, press the delete icon next to their name.
Assets: approving and rejecting
Press View Assets on a space card to open its Review Assets. Back to Spaces takes you back to the list.
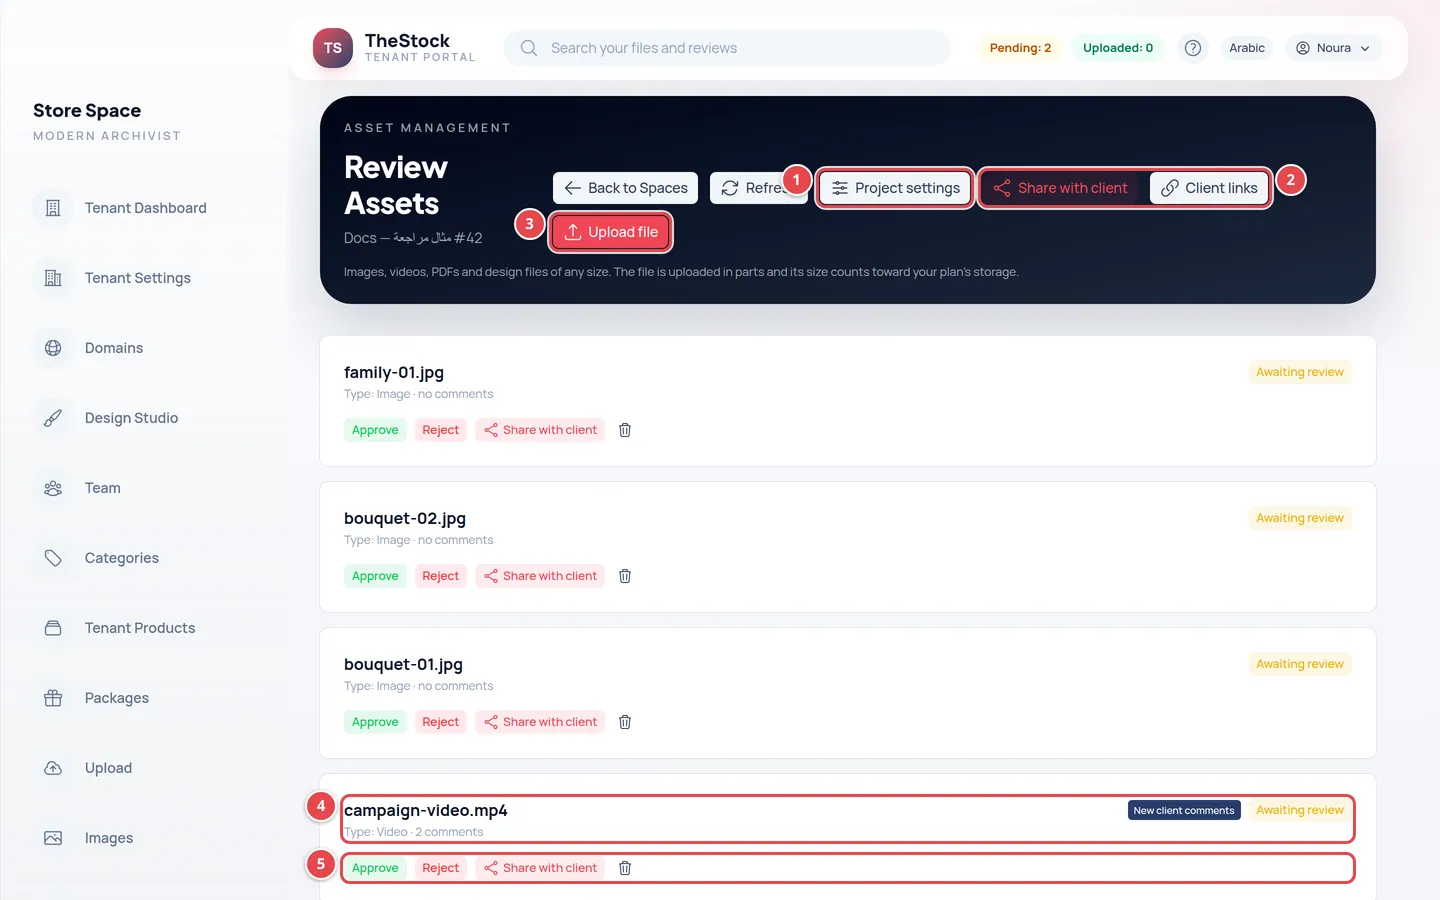
- Project settings.
- Share with client and Client links for the whole project (depends on your plan).
- Upload file.
- An asset card: its Type, comment count and status, and the New client comments badge when there are any.
- The Approve, Reject and Share with client buttons, and delete file.
Press Approve or Reject on the card, confirm, and you see Decision submitted. Deleting an asset also asks you first, and deletes the file with all its versions.
Uploading a file
Press Upload file
At the top of the Review Assets page press Upload file. The owner and admins see the button.
Choose the file
Images, videos, audio, PDFs and design files of any size: there is no limit per file. The file goes up in parts with a progress bar and a Cancel button, and if the connection drops for a moment the upload resumes where it stopped. When it is done you see File uploaded and the asset appears in the list under the file name, with its first version v1.
The only limit is the storage left in your plan. The file's size is reserved from your storage before the upload starts, so if there is not enough you see Not enough storage in your plan for this file and nothing is saved. If you cancel, or the upload stops before it finishes, the reserved size goes back to your storage.
HEIC/HEIF images and MXF videos are now accepted too. HDR clips are previewed converted to SDR, and interlaced clips are deinterlaced. Very large PDFs or images that exceed the processing time limit fail with a clear timeout message.
Audio files are accepted too: WAV, AIFF, FLAC, MP3, M4A/AAC and OGG. Each one gets a listening copy with a waveform that works as the timeline: click it to move through the file, press Comment here to comment at the current second, and click any comment's marker to jump to it. With a watermark on, clients hear a copy with a short repeating tone instead of the visual mark.
Automatic processing
After the upload the file is prepared for viewing automatically, with nothing for you to do. The Versions tab shows each version's state:
| State | What it means |
|---|---|
| Processing | You see Preparing the preview…. Large videos can take a few minutes, and the page updates by itself. |
| Ready | The preview is ready and you can comment on it. |
| Processing failed | You see The preview could not be prepared and a Process again button to try once more. |
| No preview | A file type the browser cannot show (such as design files): you see No preview for this file type, and download it to open it. |
If your storage fills up before the viewing copies are ready, you see Storage full: this file is not visible to clients. Your team can still review it, and clients see it once you free up storage or upgrade your plan.
The review viewer
Press an asset card to open the viewer full screen: the file on one side and, beside it, the Comments, Versions and Settings tabs, plus Client links when your plan includes them.
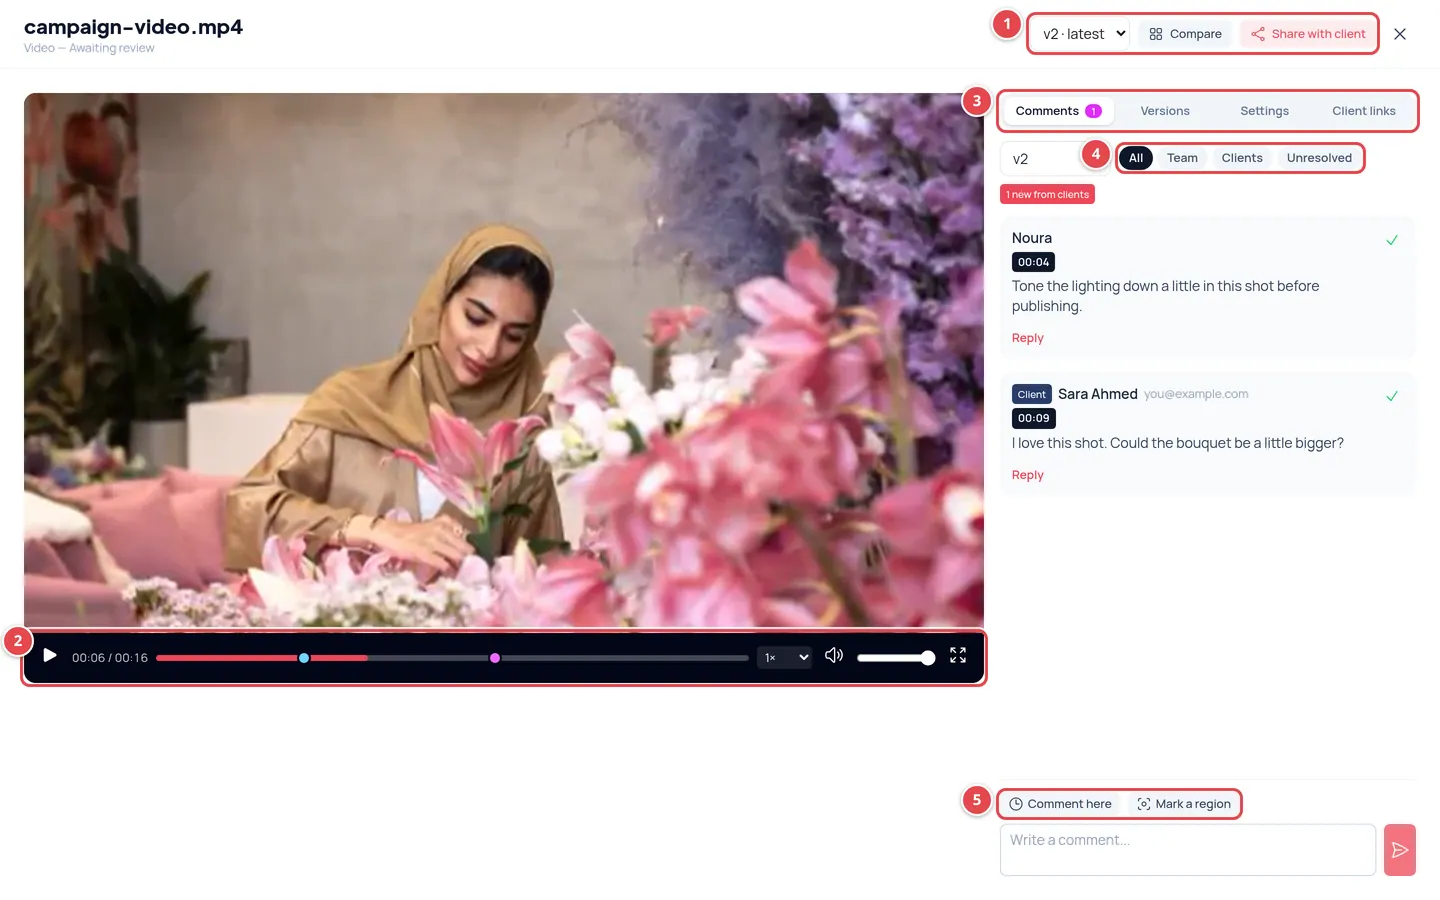
- The version picker, Compare and Share with client.
- The player controls: Play, the Timeline with a marker for each comment, Playback speed, sound, Full screen.
- The tabs: Comments, Versions, Settings and Client links.
- The comment filter: All, Team, Clients and Unresolved.
- The Comment here and Mark a region buttons above the comment box.
| File type | What the viewer shows |
|---|---|
| Image | Zoom in and Zoom out, and drag to move around a zoomed image. |
| Video | A player with Play and Pause, the Timeline to seek, Playback speed, Mute and Volume, and Full screen. |
| First page or All pages. | |
| Other files | No preview, and a Download button. |
Commenting at a second or on a region
At a second in a video
Play the video and, at the moment you want, press Comment here. The video pauses and the time (such as 01:23) is attached beside the comment box.
On a region
Press Mark a region, then drag on the picture or on the paused video frame to draw a rectangle. On a video the region is saved with its time.
Write and send
Type in Write a comment... and send. To drop the time or region before sending, press the × beside it.
Comments are listed in order, each with its time or the word Region. Press the time to jump the video there, or hover a comment to see its region on the file. Each comment has Reply (a reply cannot be replied to), Resolve, which marks it Resolved with its replies, and Reopen. A deleted comment with replies stays in place as Comment deleted and its replies remain visible.
Client comments and decisions
Comments from clients who opened a share link appear here next to your team's, with a Client badge, the client's name and email. You reply to them and resolve them like any comment. Use the Clients filter to see them alone, or Unresolved for what still needs an answer.
An asset card shows New client comments since you last opened it, and the Comments tab shows how many are new. Below the file, the Decisions section lists every approval or change request with its author's name, clients marked Client, and the version.
Versions and compare
| What you want | How |
|---|---|
| Add a version | In the Versions tab press Upload new version. It uploads the same way as the first file and becomes the latest. |
| See an older version | Pick it in the list at the top of the viewer (v1, v2…, the newest marked latest), or press it in the Versions tab. |
| A version's comments | Comments belong to their version. In the Comments tab pick the version, or All versions to show the version number next to each comment. A new version starts with no comments. |
| Compare | When a file has two versions or more, press Compare to see Version A and Version B side by side: the two images zoom and move together, and the two videos play together. |
| Download or delete a version | In the Versions tab each version has a Download icon and a delete icon. An asset keeps at least one version; to remove the last one, delete the asset itself. |
Project and file settings
These settings decide what a client you share a link with can do. Press Project settings at the top of the assets page to set them for the whole project, or open a file and choose the Settings tab to set them for that file only.
| Setting | Options | Default |
|---|---|---|
| Client decision (project only) | Opinion only (the team decides) or Final (changes the file's status). | Opinion only |
| Client favorites | Allowed or not: the client marks the files they pick. | Not allowed |
| Watermark | Off, Store logo, Text, Uploaded image. | Off |
| Client download | Not allowed, The shown copy, The original file. | Not allowed |
| Client comments | Allowed or not. | Allowed |
In a file's settings every setting Follows project by default. Untick it to set a value for this file that overrides the project's. Under each setting, Applies shows the value in force and where it comes from: set on this file, from the project or default. Then press Save settings.
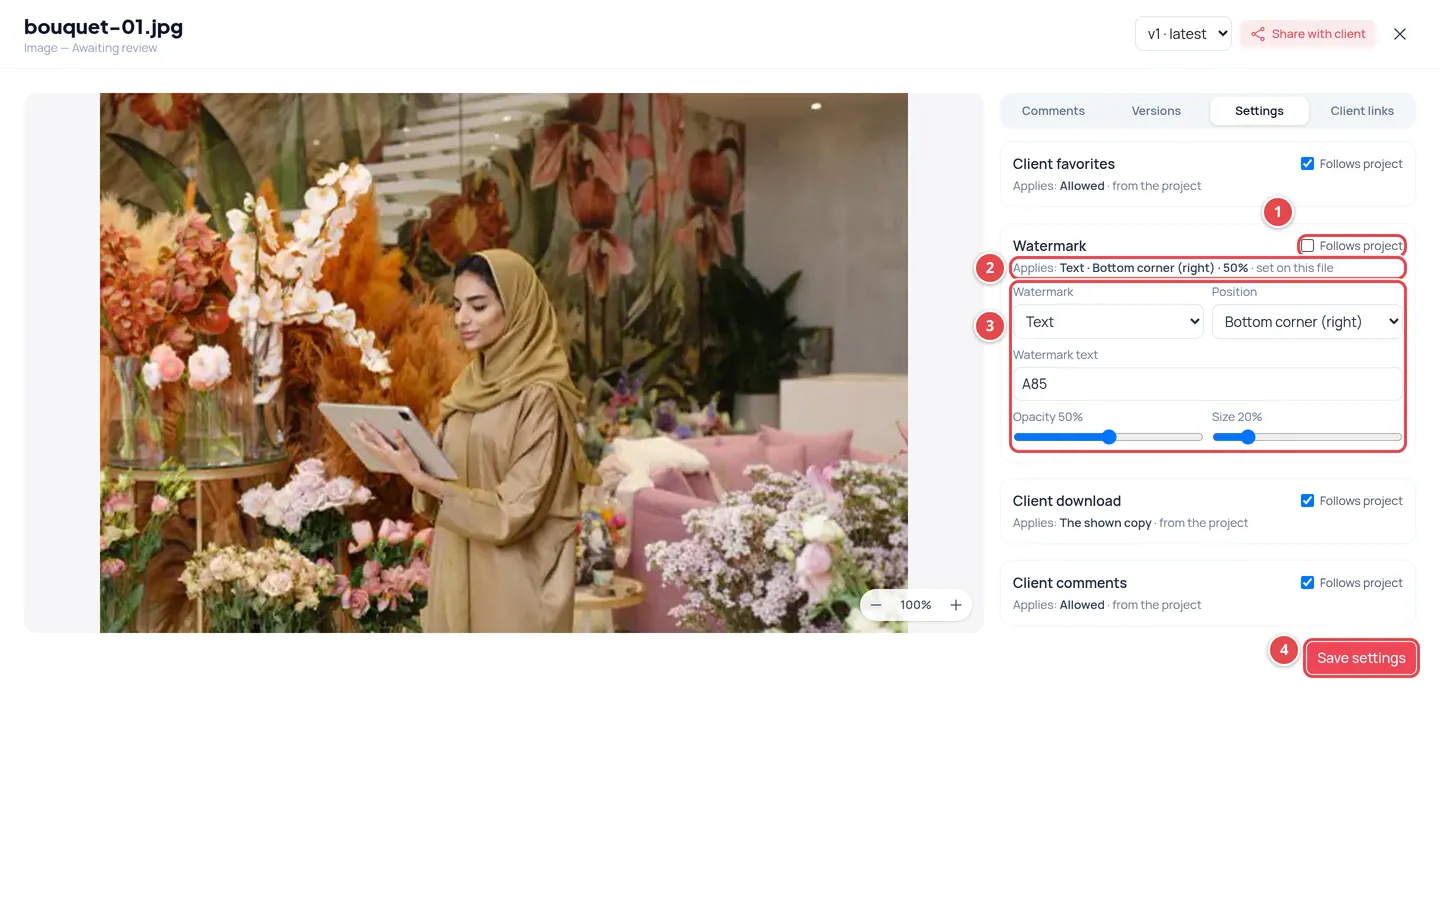
- Follows project for each setting.
- Applies and where the value comes from.
- The watermark: type, Position, Opacity and Size.
- Save settings.
Watermark
Choose Store logo, or Text and enter the Watermark text, or Uploaded image and pick an image or press Upload image (PNG, JPEG or WebP up to 10 MB). Then choose the Position: one of the four corners, Center, or Repeated across the whole file, and set the Opacity (10 to 90%) and Size (5% to 100%).
After you save, a watermarked copy is prepared for each file: you see Preparing the watermarked copies…, then Watermarked copy ready. Your team always sees the file without the mark; to see what the client sees, turn on View as client at the top of the viewer. While the watermark is on, the client only ever sees the marked copy.
Sharing with clients
The Share with client button on the project or on any file creates a link your client opens on your store's domain without an account, to view, comment and approve as you allow. Details in the next article.
Archiving
The archive icon on a space card archives it after you confirm, closing it to new reviews. An archived space still counts toward your number of spaces.
Who can create spaces and upload files?
The owner and admins. Editors browse spaces and assets and comment, and viewers only browse.
What is the difference between Reviewer and Editor in a space?
It is the participant's role in that space only, and does not change their role in the store team.
What is the largest file I can upload?
There is no limit per file. The limit is the storage left in your plan, and it covers the file and its generated copies.
My video is still processing?
Long videos take minutes. The page updates by itself. If you see Processing failed, press Process again.