
Design: menus, pages and theme
Managing your store menus, pages and theme, the draft–review–publish cycle, and preview links.
When you press Design Studio in the side menu, the Design Overview page opens. It is one long page of cards that brings together everything about how your store looks: branding, menus, pages, theme and the order of homepage sections.
For visual editing, where you see your store and change it directly, press Open Design Studio at the top of the page. The studio has its own article: The visual design studio.
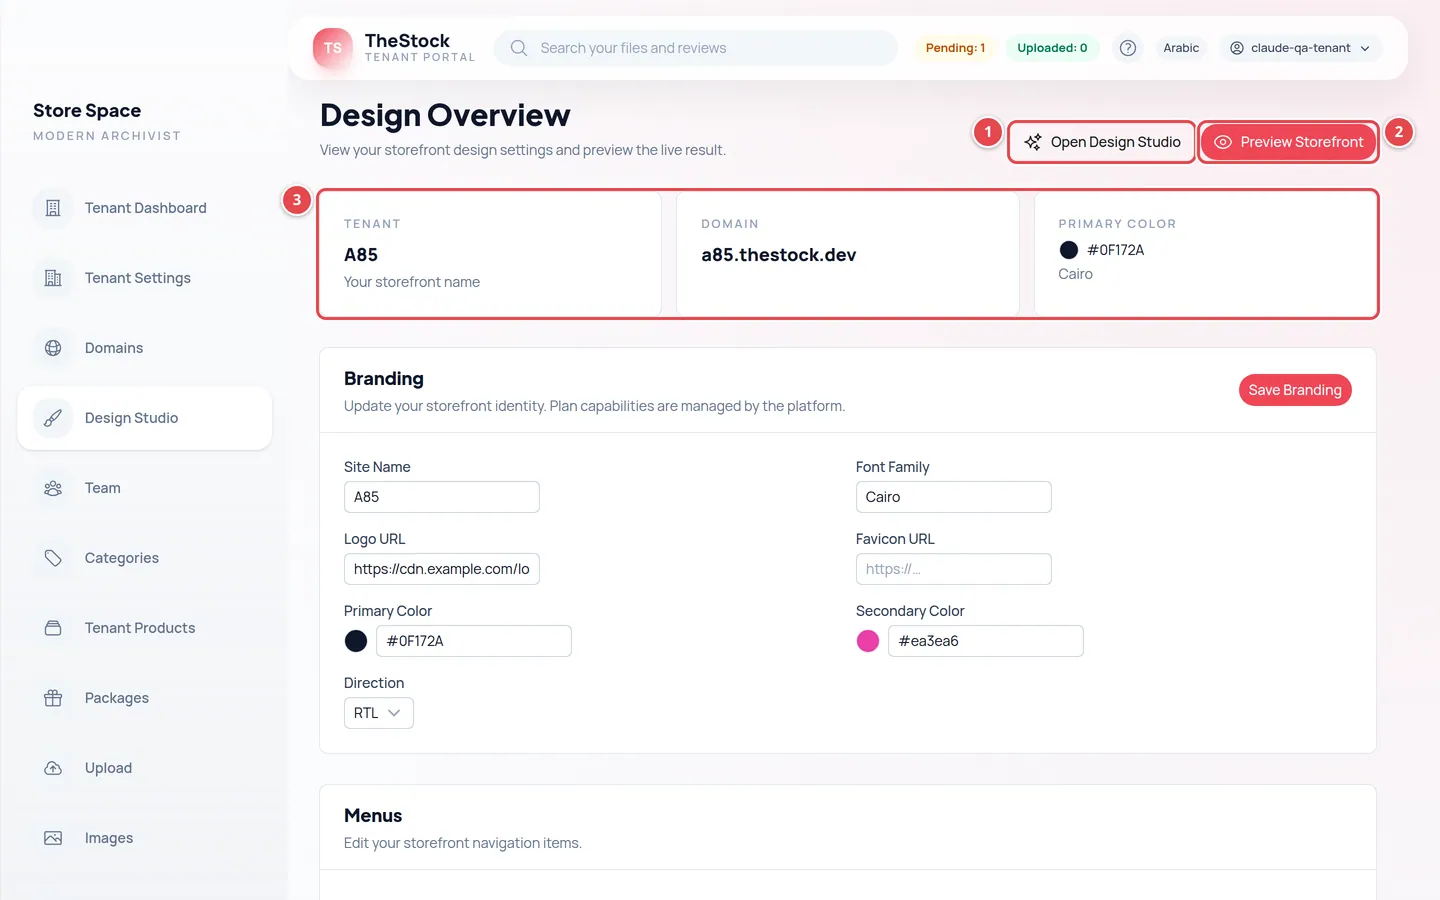
- Open Design Studio: the visual editor.
- Preview Storefront: opens your store in a new tab with the changes not yet published.
- The cards: branding, menus, pages, theme, layout preset.
Menus
Menus are the links in your store’s top bar and footer. Every store has five ready-made Core menus, such as the main menu and the footer. Core menus cannot be deleted, but you can empty or hide them.
In the Menus card on this page you quickly edit the items of an existing menu: choose the menu, reorder items with the arrows, press Edit or Delete, or add one with Add Item.
For sub-items, creating new menus and sending a menu for review, use the menu editor in the studio. It has three tabs:
| Tab | What you do there |
|---|---|
| Menu items | Adding items and sub-items and ordering them. |
| Menus | Creating a New menu and choosing its place: Navbar (extra button) or Footer (extra column). |
| Navigation | The top-bar buttons and what shows under them. Changes appear on your store as soon as you press Save navigation. |
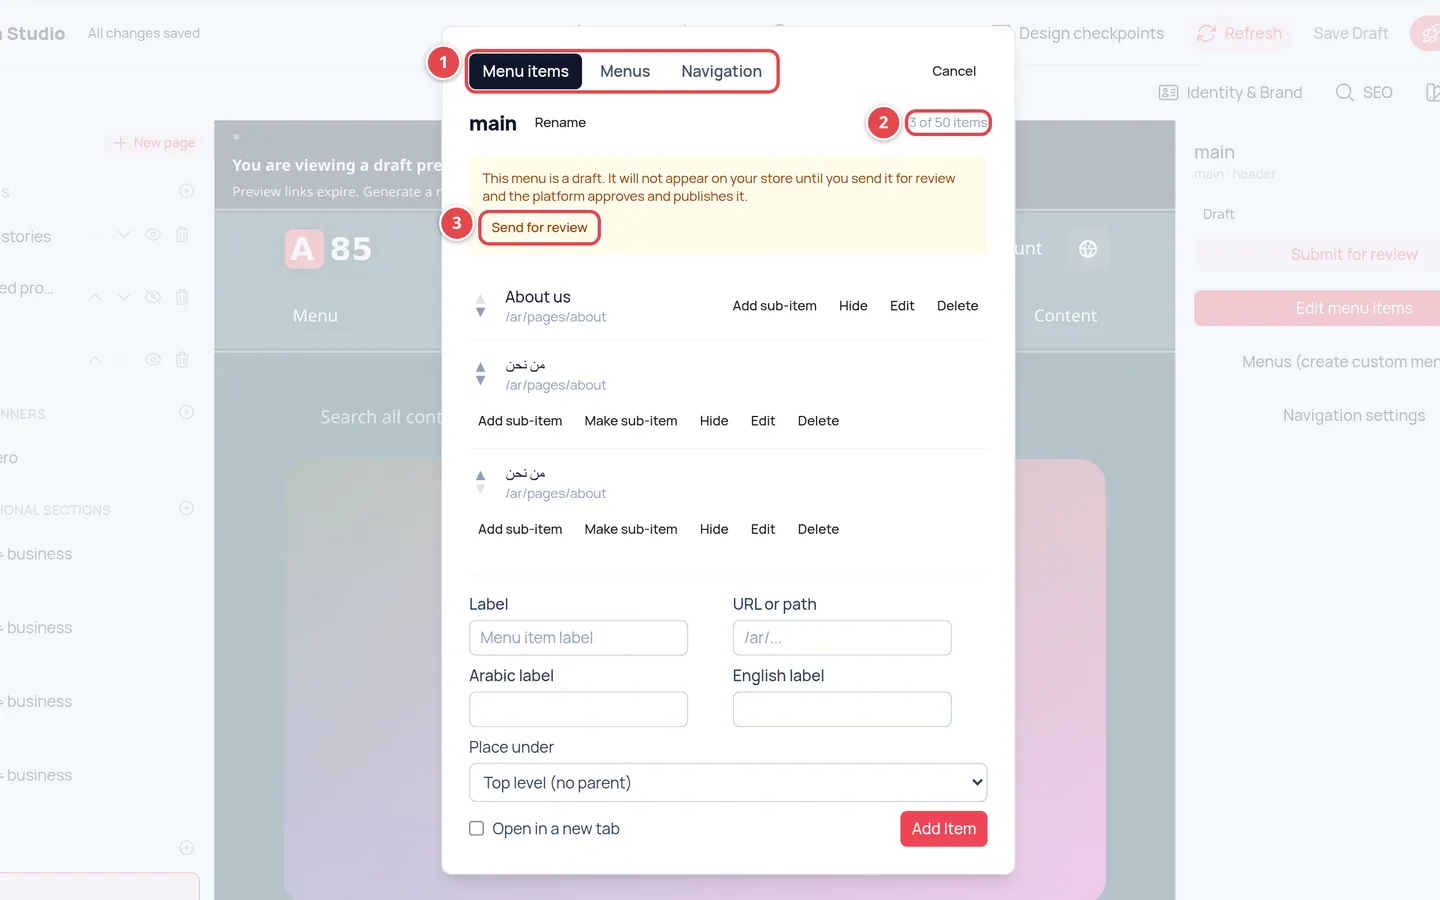
- The three tabs.
- The item counter: how many items the menu has out of the maximum.
- Send for review: for a new menu that is still a draft.
Menu limits
| Limit | Value |
|---|---|
| Items in one menu (sub-items included) | 50 items |
| Sub-items under one item | 20 items |
| Levels of sub-items | One level only |
| Custom menus you create | 10 menus, on top of the five core menus |
These limits are the same for every store and do not change with your plan.
Publishing a new menu
On the Menus tab press New menu, type its title, then Create menu. The menu is created as a draft.
Add its items on the Menu items tab.
Press Send for review. The The Stock platform team reviews and publishes it.
Content pages
In the CMS Pages card you create pages such as "About us" and "Terms of use". Press New Page, type the Title, the Slug and the content, then Save.
The slug is the part of the link after your store name, written in lowercase English letters, numbers and hyphens only.
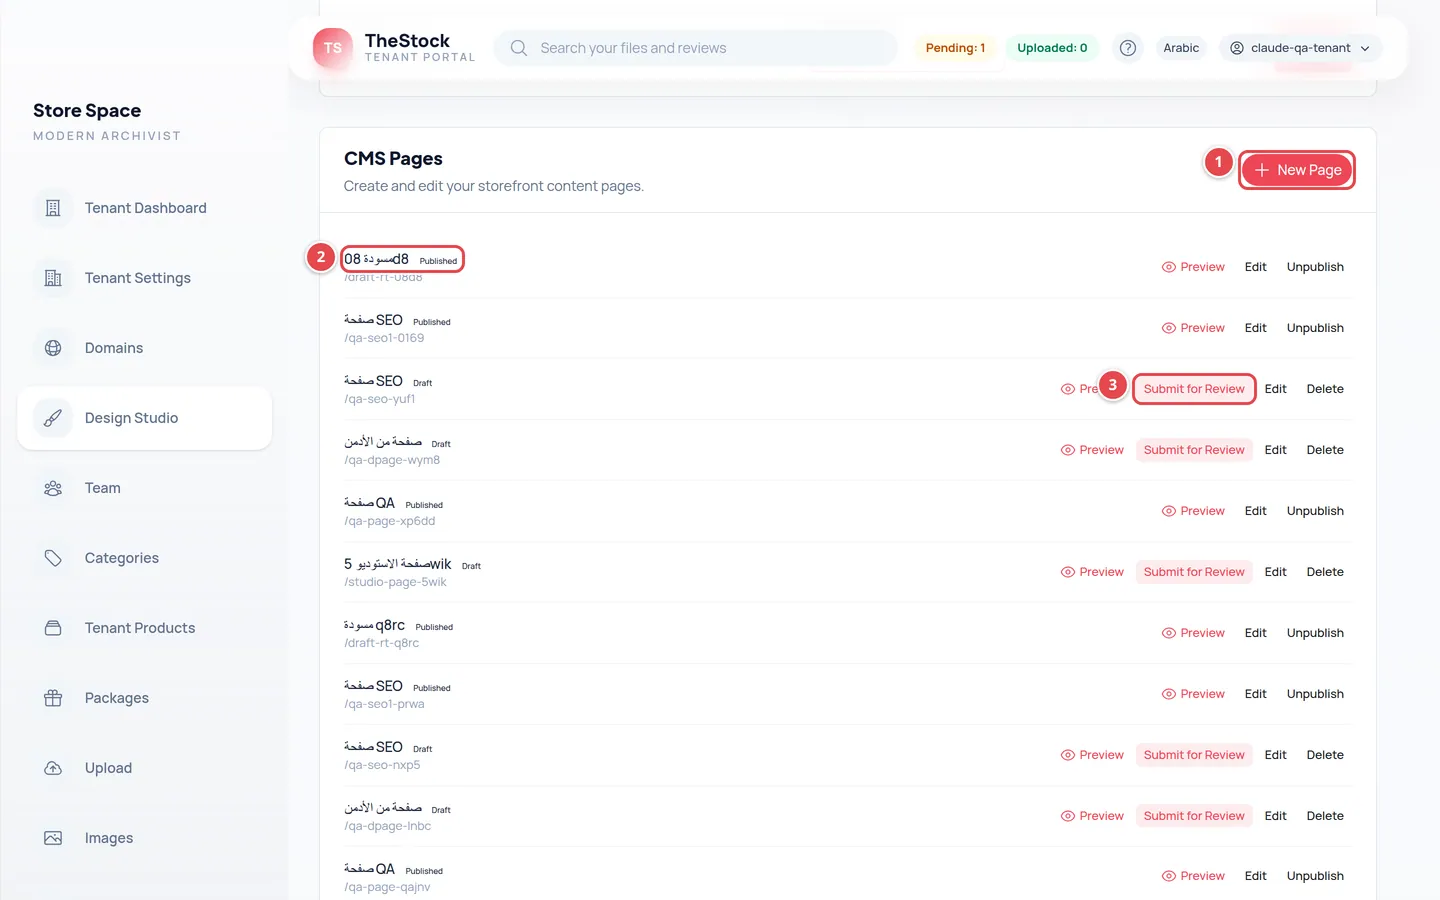
- New Page.
- The status badge of each page.
- Submit for Review for a page in draft.
Page states
| State | What it means |
|---|---|
| Draft | You are working on it; customers do not see it. |
| In review | Sent for review and waiting for approval. |
| Approved | Approved and waiting to be published. |
| Published | Live on your store. |
If a page is sent back to you, Returned by reviewer appears next to it with the reason. Edit it and send it again.
If you edit a published page, customers keep seeing the old version and the page shows an Unpublished changes badge until you publish the changes. To take a published page down, press Unpublish.
| Role | What they can do with pages |
|---|---|
| Owner and admin | Create, edit, approve, publish and unpublish. They can publish straight from the studio without going through review. |
| Editor | Create, edit and Submit for Review. The owner or an admin approves and publishes. |
| Viewer | View only. |
Theme
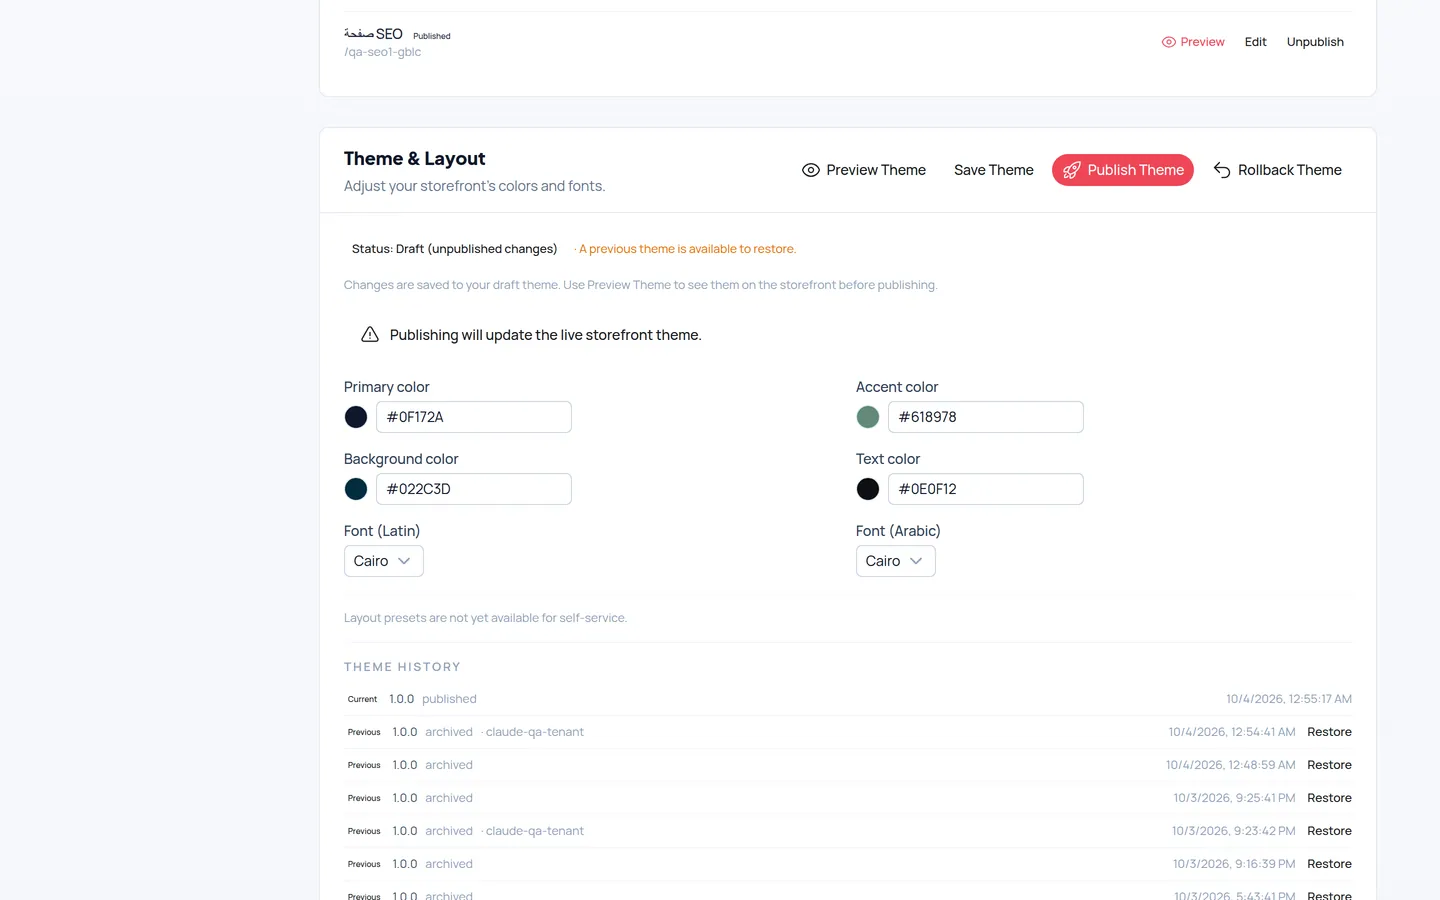
In the Theme & Layout card you choose your store’s colours and fonts: Primary color, Accent color, Background color and Text color, plus an Arabic and a Latin font.
Save a draft
Change the colours and fonts, then press Save Theme. Changes save as a draft and the status shows Draft (unpublished changes).
Preview
Press Preview Theme to see your store with the new theme before anyone else does.
Publish
Press Publish Theme. Your live store updates straight away.
Roll back if needed
Press Rollback Theme to bring back the previously published theme, or pick an older version in Theme history and press Restore.
Only the owner and admins can save and publish the theme. Colours you choose in Store settings also reach the theme draft here.
Ordering homepage sections
In the Layout Preset card you find the list of your homepage sections. Reorder them or hide what you do not want, press Save draft, then Publish to make it live on your store.
Preview links
Every preview you open creates a temporary token that lets someone see unpublished changes. The tokens are listed in the Active Preview Tokens card, and each one expires after 24 hours.
If you shared a preview link with someone and no longer want them to see the changes, press Revoke next to the token.
I made a change and cannot see it on my store.
The change is most likely still a draft. Publish the theme with Publish Theme, publish the page, or send the menu for review.
I sent a menu for review. When will it appear?
Once the platform team approves and publishes it. Do not edit it while you wait, or it goes back to draft.
I published a theme and do not like it.
Press Rollback Theme to bring back the theme published before it.